

Scotch Tape Nail Art Designs
Beauty
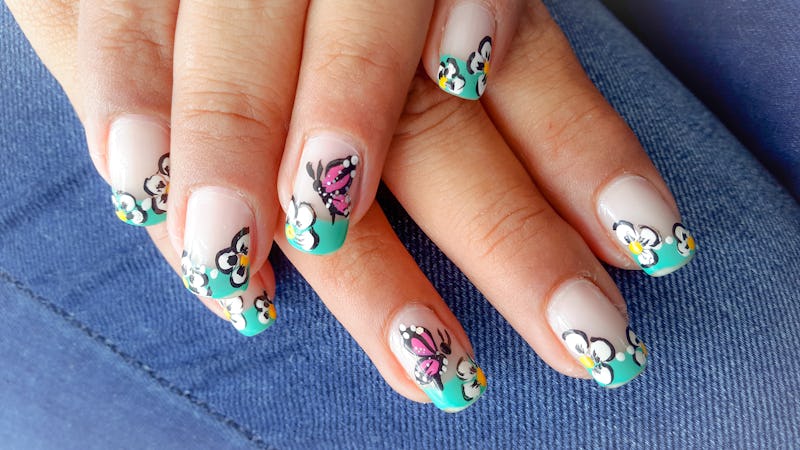
4 Easy Butterfly Nail Art Designs You Can Totally Do Yourself
They're ridiculously cute.
Kryssia Campos/Moment Open/Getty Images
Animal print nail designs are always cute. Everything from cow print to tortoiseshell (and leopard, obviously) tips often flood social media feeds, but there's another animal-themed design that's just as gorgeous: butterfly nail art, which you can actually do yourself.
These may be the most mood-boosting animal print nails you can wear, BTW. "Butterflies signify hope," Ana Cando, Sundays nail specialist, tells Bustle. Her take? Rocking this type of nail art can bring "positivity for 2021." Sounds good to me.
To get intel on the best ways to rock butterfly-inspired nail designs, Bustle spoke with a bunch of manicure pros — including LeChat Nails educator Anastasia Totty, CND brand ambassador Winnie Huang, and celebrity manicurist and Color Street ambassador Kimmie Kyees — for their tips, and all the looks are stunning. From using decals to painting with a watercolor-like technique, these mani designs are sure to turn heads. And they're perfect for springtime (which is around the corner, believe it or not).
The best part of all? Sure, butterfly wings are intricate prints, but these pro-approved designs are simple enough for you do without even stepping into a salon. Below, these four butterfly nail art designs will serve as serious nail-spiration for your next mani.
We only include products that have been independently selected by Bustle's editorial team. However, we may receive a portion of sales if you purchase a product through a link in this article.
1
Accent Wing
Cando's butterfly wing accent nail is the perfect way to pay a subtle homage to the gorgeous creature. To get the look, she says to first clean and prep your nails and apply a base coat. Then, paint each nail — except for the one you're doing the accent on — a single color (she recommends a light neutral like Sundays No. 50). Then, on your selected accent nail, choose a different base polish and apply two coats. Allow the color to fully dry in order to prevent bleeding.
Using a nail art brush and a darker color, outline the butterfly print by creating an arch on the inside of your nail. When the first arch is done, use your nail brush to create a diagonal line near the bottom of your nail bed. Then, paint a wavy line outline at the top of your nail, and when that's dry, fill it in by painting the entire space the same color. Next, paint three curved lines across the base color that touch the bottom outline of the top shape and end at the diagonal line from earlier. Using a dot art pen to create dots with an accent color in the open space. Finally, add two layers of top coat once everything is dry.
2
Watercolor Butterflies
Totty's butterfly look uses a gorgeous watercolor theme. While this look may be a bit more advanced, it's still doable at home with some practice.
To get the look, first, apply a gel base coat and cure. Then, apply one coat of each of your chosen base colors (her look uses LeChat Perfect Match Lavender Fields and LeChat Perfect Match Wisteria) so that each takes up half of your nail. Next, use a clean brush and carefully blend the colors together by moving the brush up and down the center until they meet and begin to combine. Once that's dry, apply a gel base coat, but before it's fully dry, apply small strokes of a third polish color with a liner brush in the shape of a butterfly. Draw two wings, making one is bigger than the other. Pro tip: The strokes should resemble the shape of a comma.
Next, using a black shade (like Olive & June's E+M) and the liner brush, draw the butterfly head and body by adding dots with a dotting tool. Draw one long comma for the body and a big dot for the head (like a semi-colon). Then, use a white shade (like Triple O's Timbuktu) and a holographic glitter polish to place dots on the wings. Finish your look by applying a topcoat.
3
Mosaic-Like Wing Print
This butterfly nail art design, created by Huang, focuses on multi-colored, mosaic-like wings that decorate each nail.
To get the look, Huang says to first apply one layer of pale pink polish — she recommends CND Vinylux in Be Demure. Then, using a striper brush, create the outline of the butterfly's wing with a black polish. Next, fill those outlines in using any mix of colors you'd like (she opted for purples, pinks, and golds) using a small detailing brush. Then, brush on a sheer glitter top coat, like La Pierre Cosmetics' Diamond Dust. Finally, add a top coat, and voila.
4
Decal Butterflies
Kyees takes the most beginner-friendly approach to butterfly nails. She uses Color Street nail strips to create a wing-inspired look that's foolproof.
To get the look, begin by cleaning and prepping your nails. Then, remove the protective strip from the sticker and apply to the nail, starting with the pinky first. Stretch the strip to fit over the nail and hold in place. Crease the strip over the edge of the nail and then use a nail file — or even your own nail — to remove the excess. That's it — you're done. You can also opt for another stick-on option, like these nail stickers from Amazon. Talk about easiest nail art ever.
Source: https://www.bustle.com/style/butterfly-nail-art
0 Response to "Scotch Tape Nail Art Designs"
Post a Comment